 BORETS
In this guide
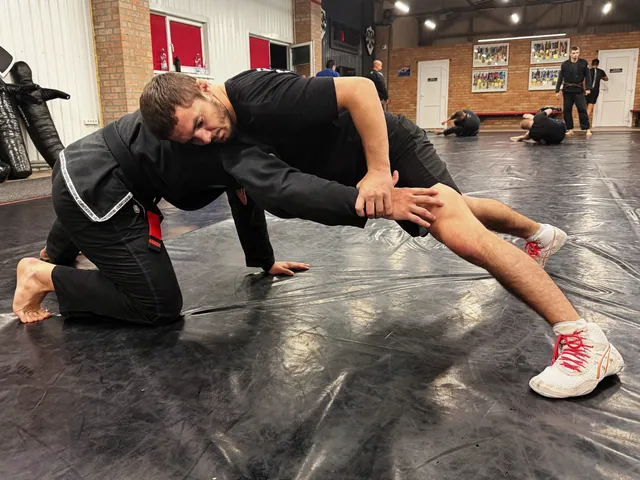
A snap-down uses contact and movement to bring an opponent’s upper body below its useful standing position. A front headlock is one possible connection that follows. The practical goal here is to control the shoulder-and-arm line and move to an angle. The exercise should teach a positional transition, with the partner able to move and breathe, rather than reward pulling harder on the neck.
Find a posture you can influence
Start with a coach-approved head-and-arm contact from standing. Keep your elbows organised and your own feet underneath you. Move the opponent with a short push, pull or step and notice whether they lean back into the contact. That response can create the opportunity to redirect their upper body. If the defender stays balanced and keeps the distance, do not hang from the head. Change your tie or movement. A setup is doing useful work when it changes the opponent’s support, not merely when it looks busy.
Combine the snap with your own step
Redirect the upper body as your feet create space for it to move. Keep contact broad and guide the shoulder line together with the head rather than jerking the head in isolation. The partner may post a hand or adjust a knee; leave a clear, agreed route to the mat. Your coach should set the direction and amplitude for the pair. Early practice can stop as soon as posture changes. Reaching the floor is not necessary to learn whether the timing and movement worked.
Organise front-headlock control
After the snap, maintain an appropriate connection to the head and one arm while staying able to move your feet. Keep the grip and pressure where the coach has demonstrated them. Avoid squeezing the throat, folding the neck or letting your entire weight hang from it. The defender should retain a clear release signal. An unstable grip that needs increasing force is a reason to pause and reset. The useful information is whether you can influence the shoulders without sacrificing your own balance.
Move around a controlled shoulder line
For the introductory go-behind, keep the opponent from immediately turning their shoulders toward you while your feet circle to the side. Transfer your connection toward the hips as the angle opens. Do not drag the head one way while running your body the other way. If the defender follows your movement and faces you, acknowledge that the angle has closed. Re-establish the position or return to standing. A go-behind becomes reliable when your footwork and upper-body control keep serving the same direction.
Diagnose the failed phase
If the snap does not change posture, inspect the setup and the defender’s support. If posture changes but control vanishes, inspect the transition of your hands and feet. If front control works but the go-behind fails, inspect whether the defender is able to turn their shoulders before you pass them. Avoid treating all three as a weak snap. Film a full-body view and ask your coach to identify the first point where the intended relationship changed, before discussing the final outcome.
Progress through cooperative movement
Begin with a posture-change drill that ends before the mat. Add the front position, an immediate release and then the go-behind. Later, let the defender either recover upright posture or turn to face the attacker. Use low intensity until both responses are understood. For children, begin with arm-and-shoulder movement games and let the coach decide whether neck contact is appropriate at all. The training record can stay simple: what created the forward reaction, which response followed and whether you kept a balanced route around.